Red Hat blog
In my previous blog I went over how to install OpenShift 4.2 on VMware vSphere 6.7 using DHCP. Using DHCP with address reservation via MAC address filtering is a common way of ensuring network configurations are set and consistent on Red Hat Enterprise Linux CoreOS (RHCOS).
Many environments would rather use static IP configuration to achieve the same consistent network configurations. With the release of OpenShift 4.2, we have now added the ability to configure network configurations (and persist them across reboots) in the preboot ignition phase for RHCOS.
In this blog we are going to go over how to install OpenShift 4.2 on VMware vSphere using static IPs.
Environment Overview
As in the previous blog, I am using vSphere version 6.7.0 and ESXi version 6.7.0 Update 3. I will be following the official documentation where, you can read more information about prerequisites including the need to set up DNS, Load Balancer, Artifacts, and other ancillary services/items.
Prerequisites
It's always important that you get familiar with the prerequisites by reading the official documentation before you install. There you can find more details about the prerequisites and what they entail. I will go over the prerequisites at a high level, and will link examples where possible.
vSphere Credentials
I will be using my administrative credentials for vSphere. I will also be passing these credentials to the OpenShift 4 installer and, by extension, to the OpenShift cluster. It's not a requirement to do so, and installing without the credentials will effectively turn your installation into a "Bare Metal UPI" installation. Most notably, you'll lose the ability to dynamically create VDMKs for your applications at install time.
DNS
Like any OpenShift 4 installation, the first consideration you need to take into account when setting up DNS for OpenShift 4 is the "cluster id". The "cluster id" becomes part of your cluster's FQDN. For example; with a cluster id of "openshift4" and my domain of "example.com", the cluster domain (i.e. the FQDN) for my cluster is openshift4.example.com
DNS entries are created using the $CLUSTERID.$DOMAIN cluster domain FQDN nomenclature. All DNS lookups will be based on this cluster domain. Using my example cluster domain, openshift4.example.com, I have the following DNS entries set up in my environment. Note that the etcd servers are pointed to the IP of the masters, and they are in the form of etcd-$INDEX.
[chernand@laptop ~]$ dig master1.openshift4.example.com +short

192.168.1.111

[chernand@laptop ~]$ dig master2.openshift4.example.com +short

192.168.1.112

[chernand@laptop ~]$ dig master3.openshift4.example.com +short

192.168.1.113

[chernand@laptop ~]$ dig worker1.openshift4.example.com +short

192.168.1.114

[chernand@laptop ~]$ dig worker2.openshift4.example.com +short

192.168.1.115

[chernand@laptop ~]$ dig bootstrap.openshift4.example.com +short

192.168.1.116

[chernand@laptop ~]$ dig etcd-0.openshift4.example.com +short

192.168.1.111

[chernand@laptop ~]$ dig etcd-1.openshift4.example.com +short

192.168.1.112

[chernand@laptop ~]$ dig etcd-2.openshift4.example.com +short

192.168.1.113
The DNS lookup for the API endpoints also needs to be in place. OpenShift 4 expects api.$CLUSTERDOMAIN and api-int.$CLUSTERDOMAIN to be configured, they can both be set to the same IP address - which will be the IP of the Load Balancer.
[chernand@laptop ~]$ dig api.openshift4.example.com +short

192.168.1.110

[chernand@laptop ~]$ dig api-int.openshift4.example.com +short

192.168.1.110
A wildcard DNS entry needs to be in place for the OpenShift 4 ingress router, which is also a load balanced endpoint.
[chernand@laptop ~]$ dig *.apps.openshift4.example.com +short

192.168.1.110
In addition to the mentioned entries, you'll also need to add SRV records. These records are needed for the masters to find the etcd servers. This needs to be in the form of _etcd-server-ssl._tcp.$CLUSTERDOMMAIN in your DNS server.
[chernand@laptop ~]$ dig _etcd-server-ssl._tcp.openshift4.example.com SRV +short

0 10 2380 etcd-0.openshift4.example.com.

0 10 2380 etcd-1.openshift4.example.com.

0 10 2380 etcd-2.openshift4.example.com.
Please review the official documentation to read more about the prerequisites for DNS before installing.
Load Balancer
You will need a load balancer to frontend the APIs, both internal and external, and the OpenShift router. Although Red Hat has no official recommendation to which load balancer to use, one that supports SNI is necessary (most load balancers do this today).
You will need to configure port 6443 and 22623 to point to the bootstrap and master nodes. The below example is using HAProxy (NOTE that it must be TCP sockets to allow SSL passthrough):
frontend openshift-api-server

    bind *:6443

    default_backend openshift-api-server

    mode tcp

    option tcplog
backend openshift-api-server
balance source
mode tcp
server btstrap 192.168.1.116:6443 check
server master1 192.168.1.111:6443 check
server master2 192.168.1.112:6443 check
server master3 192.168.1.113:6443 check
frontend machine-config-server
bind *:22623
default_backend machine-config-server
mode tcp
option tcplog
backend machine-config-server
balance source
mode tcp
server btstrap 192.168.1.116:22623 check
server master1 192.168.1.111:22623 check
server master2 192.168.1.112:22623 check
server master3 192.168.1.113:22623 check
You will also need to configure 80 and 443 to point to the worker nodes. The HAProxy configuration is below (keeping in mind that we're using TCP sockets).
frontend ingress-http

    bind *:80

    default_backend ingress-http

    mode tcp

    option tcplog
backend ingress-http
balance source
mode tcp
server worker1 192.168.1.114:80 check
server worker2 192.168.1.115:80 check
frontend ingress-https
bind *:443
default_backend ingress-https
mode tcp
option tcplog
backend ingress-https
 balance source
 mode tcp
 server worker1 192.168.1.114:443 check
 server worker2 192.168.1.115:443 check
More information about load balancer configuration (and general networking guidelines) can be found in the official documentation page.
Web server
A web server is needed in order to hold the ignition configurations and install artifacts needed to install RHCOS. Any webserver will work as long as the webserver can be reached by the bootstrap, master, and worker nodes during installation. I will be using Apache, and created a directory specifically for the ignition files.
[chernand@laptop ~]$ mkdir -p /var/www/html/{ignition,install}
Artifacts
You will need to obtain the installation artifacts by visiting try.openshift.com, there you can login and click on "VMware vSphere" to get the installation artifacts. You will need:
- OpenShift4 Client Tools
- OpenShift4 OVA
- Pull Secret
- You will also need the RHCOS ISO and the OpenShift4 Metal BIOS file
You will need to put the client and the installer in your $PATH, in my example I put mine in my /usr/local/bin path
[chernand@laptop ~]$ which oc

/usr/local/bin/oc

[chernand@laptop ~]$ which kubectl

/usr/local/bin/kubectl

[chernand@laptop ~]$ which openshift-install

/usr/local/bin/openshift-install
I've also downloaded my pullsecret as pull-secret.json and saved it under a ~/.openshift directory I created.
[chernand@laptop ~]$ file ~/.openshift/pull-secret.json

/home/chernand/.openshift/pull-secret.json: JSON data
An ssh-key is needed. This is used in order to login to the RHCOS server if you ever need to debug the system.
[chernand@laptop ~]$ file ~/.ssh/id_rsa.pub

/home/chernand/.ssh/id_rsa.pub: OpenSSH RSA public key
For more information about ssh and RHCOS, you can read that at the official documentation site.
Installation
Once the prerequisites are place, you're ready to begin the installation. The current installation of OpenShift 4 on vSphere must be done in stages. I will go over each stage step by step.
vSphere Preparations
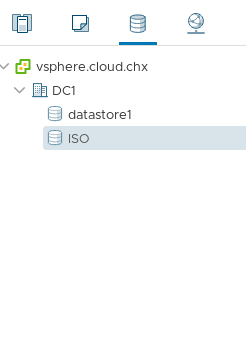
For static IP configurations, you will need to upload the ISO into a datastore. On the vSphere WebUI, click on the "Storage" navigation button (it looks like stacked cylinders), and click on the datastore you'd like to upload the ISO to. In my example, I have a datastore specifically for ISOs:
On the right hand side window, you'll see the summary page with navigation buttons. Select "Upload Files" and select the RHCOS ISO.
NOTE: Make sure you upload the ISO to a datastore that all your ESXi hosts have access to.
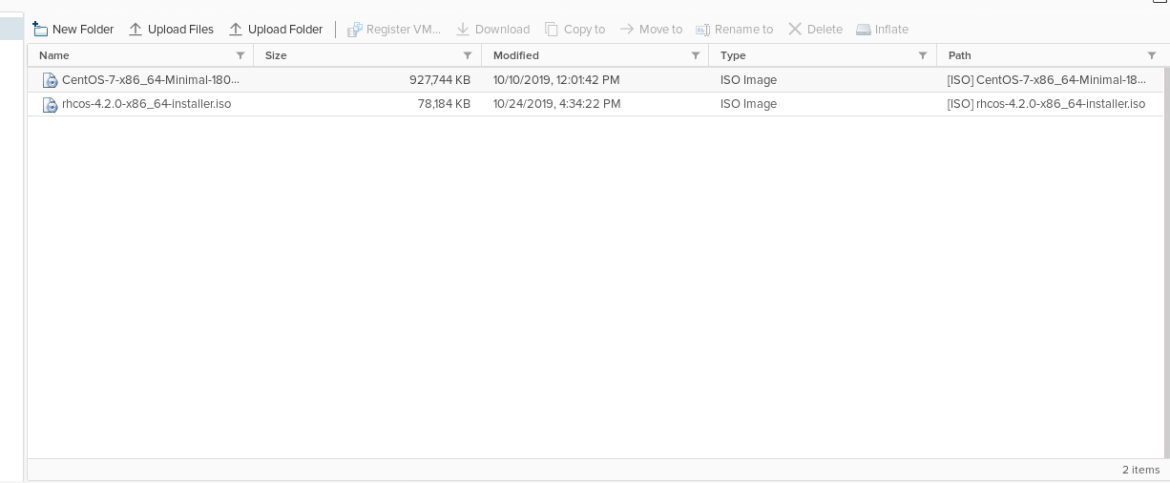
Once uploaded, you should have something like this:
You will also need the aforementioned OpenShift 4 Metal BIOS file. I've downloaded the bios file and saved it as bios.raw.gz on my webserver.
[root@webserver ~]# ll /var/www/html/install/bios.raw.gz

-rw-r--r--. 1 root root 700157452 Oct 15 11:54 /var/www/html/install/bios.raw.gz
Generate Install Configuration
Now that you've uploaded the ISO to vSphere for installation, you can go ahead and generate the install-config.yaml file. This file tells OpenShift about the environment you're going to install to.
Before you create this file you'll need an installation directory to store all your artifacts. I'm going to name mine openshift4.
[chernand@laptop ~]$ mkdir openshift4

[chernand@laptop ~]$ cd openshift4/
NOTE: Stay in this directory for the remainder of the installation procedure.
I'm going to export some environment variables that will make the creation of the install-config.yaml file easier. Please substitute your configuration where applicable.
[chernand@laptop openshift4]$ export DOMAIN=example.com

[chernand@laptop openshift4]$ export CLUSTERID=openshift4

[chernand@laptop openshift4]$ export VCENTER_SERVER=vsphere.example.com

[chernand@laptop openshift4]$ export VCENTER_USER="administrator@vsphere.local"

[chernand@laptop openshift4]$ export VCENTER_PASS='supersecretpassword'

[chernand@laptop openshift4]$ export VCENTER_DC=DC1

[chernand@laptop openshift4]$ export VCENTER_DS=datastore1

[chernand@laptop openshift4]$ export PULL_SECRET=$(< ~/.openshift/pull-secret.json)

[chernand@laptop openshift4]$ export OCP_SSH_KEY=$(< ~/.ssh/id_rsa.pub)
Once you've exported those, go ahead and create the install-config.yaml file in the openshift4 directory by running the following:
[chernand@laptop openshift4]$ cat <<EOF < install-config.yaml

apiVersion: v1

baseDomain: ${DOMAIN}

compute:

- hyperthreading: Enabled

  name: worker

  replicas: 0

controlPlane:

  hyperthreading: Enabled

  name: master

  replicas: 3

metadata:

  name: ${CLUSTERID}

networking:

  clusterNetworks:

  - cidr: 10.254.0.0/16

    hostPrefix: 24

  networkType: OpenShiftSDN

  serviceNetwork:

  - 172.30.0.0/16

platform:

  vsphere:

    vcenter: ${VCENTER_SERVER}

    username: ${VCENTER_USER}

    password: ${VCENTER_PASS}

    datacenter: ${VCENTER_DC}

    defaultDatastore: ${VCENTER_DS}

pullSecret: '${PULL_SECRET}'

sshKey: '${OCP_SSH_KEY}'

EOF
I'm going over the options at a high level:
baseDomain- This is the domain of your environment.metadata.name- This is your clusterid- Note: this makes all FQDNS for the cluster have the
openshift4.example.comdomain.
- Note: this makes all FQDNS for the cluster have the
platform.vsphere- This is your vSphere specific configuration. This is optional and you can find a "standard" install config example in the docs.pullSecret- This pull secret can be obtained by going to cloud.redhat.com.- Note: I saved mine as
~/.openshift/pull-secret.json
- Note: I saved mine as
sshKey- This is your public SSH key (e.g.id_rsa.pub)
NOTE: The OpenShift installer removes this file during the install process, so you may want to keep a copy of it somewhere.
Create Ignition Files
The next step in the process is to create the installer manifest files using the openshift-install command. Keep in mind that you need to be in the install directory you created (in my case that's the openshift4 directory).
[chernand@laptop openshift4]$ openshift-install create manifests

INFO Consuming "Install Config" from target directory

WARNING Making control-plane schedulable by setting MastersSchedulable to true for Scheduler cluster settings
Note that the installer tells you the the masters are schedulable. For this installation, we need to set the masters to not schedulable.
[chernand@laptop openshift4]$ sed -i 's/mastersSchedulable: true/mastersSchedulable: false/g' manifests/cluster-scheduler-02-config.yml

[chernand@laptop openshift4]$ cat manifests/cluster-scheduler-02-config.yml

apiVersion: config.openshift.io/v1

kind: Scheduler

metadata:

  creationTimestamp: null

  name: cluster

spec:

  mastersSchedulable: false

  policy:

    name: ""

status: {}
To find out more about why you can't run workloads on OpenShift 4.2 on the control plane, please refer to the official documentation.
Once the manifests are created, you can go ahead and create the ignition files for installation.
[chernand@laptop openshift4]$ openshift-install create ignition-configs

INFO Consuming "Master Machines" from target directory

INFO Consuming "Openshift Manifests" from target directory

INFO Consuming "Worker Machines" from target directory

INFO Consuming "Common Manifests" from target directory
Next, create an append-bootstrap.ign file. This file will tell RHCOS where to download the bootstrap.ign file to configure itself for the OpenShift cluster.
[chernand@laptop openshift4]$ cat <<EOF < append-bootstrap.ign

{

  "ignition": {

    "config": {

      "append": [

        {

          "source": "http://192.168.1.110:8080/ignition/bootstrap.ign",

          "verification": {}

        }

      ]

    },

    "timeouts": {},

    "version": "2.1.0"

  },

  "networkd": {},

  "passwd": {},

  "storage": {},

  "systemd": {}

}

EOF
Next, copy over the ignition files to this webserver:
[chernand@laptop ~]$ sudo scp *.ign root@192.168.1.110:/var/www/html/ignition/
You are now ready to create the VMs.
Creating the Virtual Machines
You create the RHCOS VMs for OpenShift 4 the same way you do any other VM. I will go over the process of creating the bootstrap VM. The process is similar for the masters and workers.
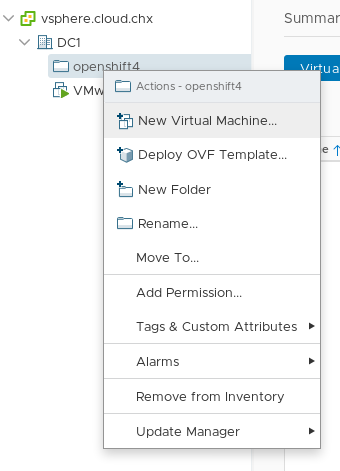
On the VMs and Template navigation screen (the one that looks like sheets of paper); right click your openshift4 folder and select New Virtual Machine.
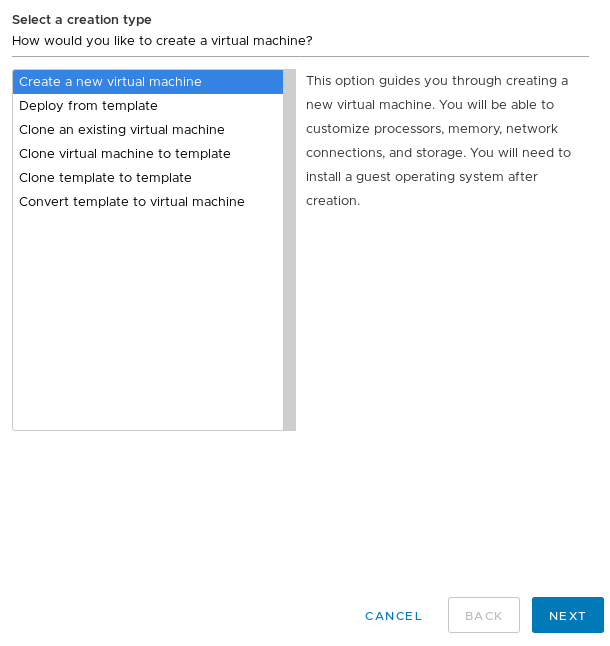
The "New Virtual Machine" wizard will start.
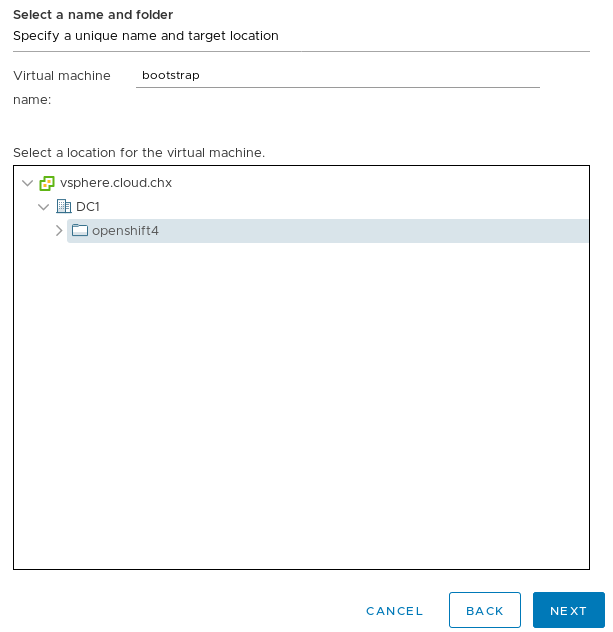
Make sure "Create a new virtual machine" is selected and click next. On the next screen, name this VM "bootstrap" and make sure it gets created in the openshift4 folder. It should look like this:
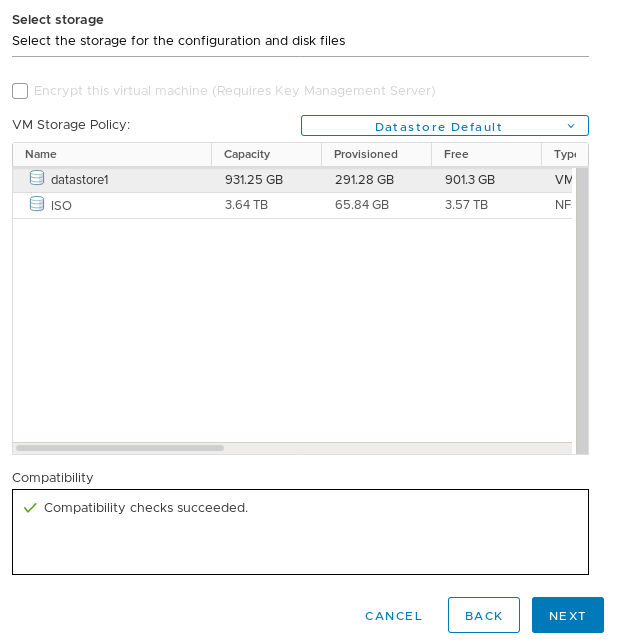
On the next screen, choose an ESXi host in your cluster for the initial creation of this bootstrap VM, and click "Next". The next screen it will ask you which datastore to use for the installation. Choose the datastore appropriate for your installation.
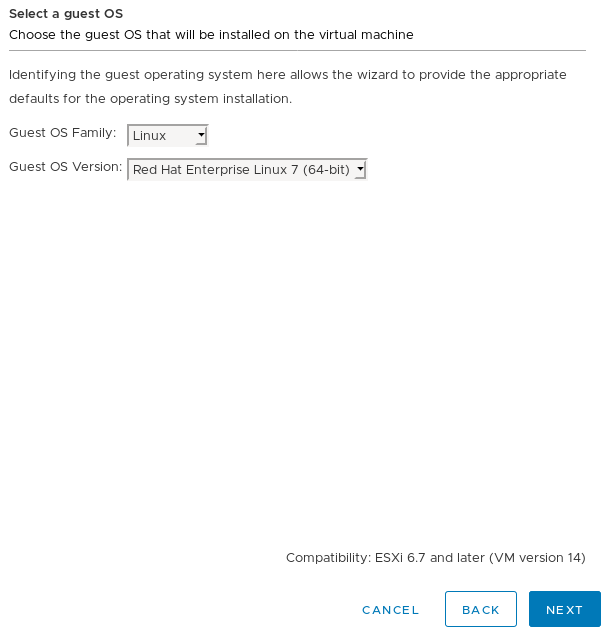
On the next page, it'll ask you to set the compatibility version. Go ahead and select "ESXi 6.7 and Later" for the version and select next. On the next page, set the OS Family to "Linux" and the Version to "Red Hat Enterprise Linux 7 (64-Bit).
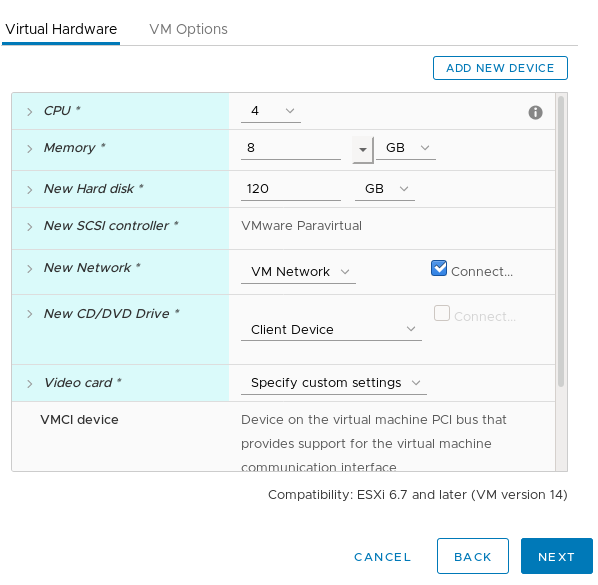
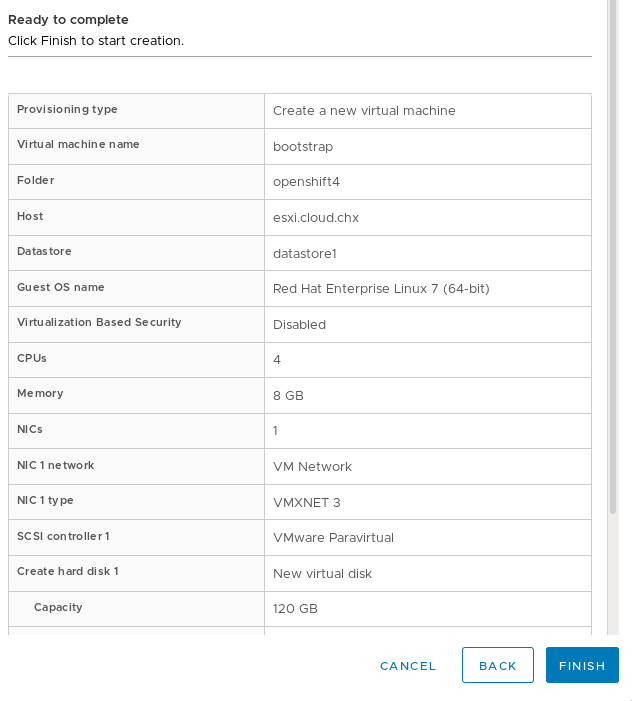
After you click next, it will ask you to customize the hardware. For the bootstrap set 4vCPUs, 8 GB of RAM, and a 120GB Hard Drive.
On The "New CD/DVD Drive" select "Datastore ISO File" and select the RHCOS ISO file you've uploaded earlier.
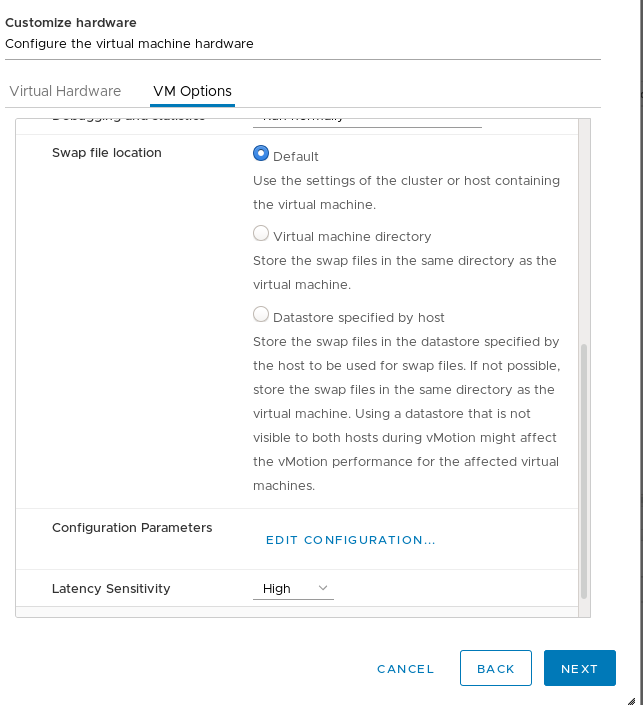
Next, click on the "VM Options" tab and scroll down and expand "Advanced". Set "Latency Sensitivity" to "High".
Click "Next". This will bring you to the overview page:
Go ahead and click "Finish", to create this VM.
You will need to run through these steps at least 5 more times (3 masters and 2 workers). Use the table below (based on the official documentation) to create your other 5 VMs.
[table id=2 /]
NOTE, if you're cloning from the bootstrap, make sure you adjust the parameters accordingly and that you're selecting "thin provision" for the disk clone.
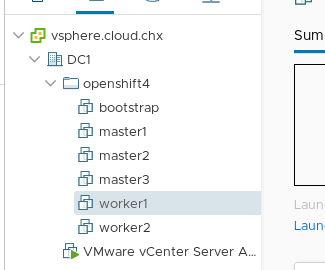
Once you have all the servers created, the openshift4 directory should look something like this:
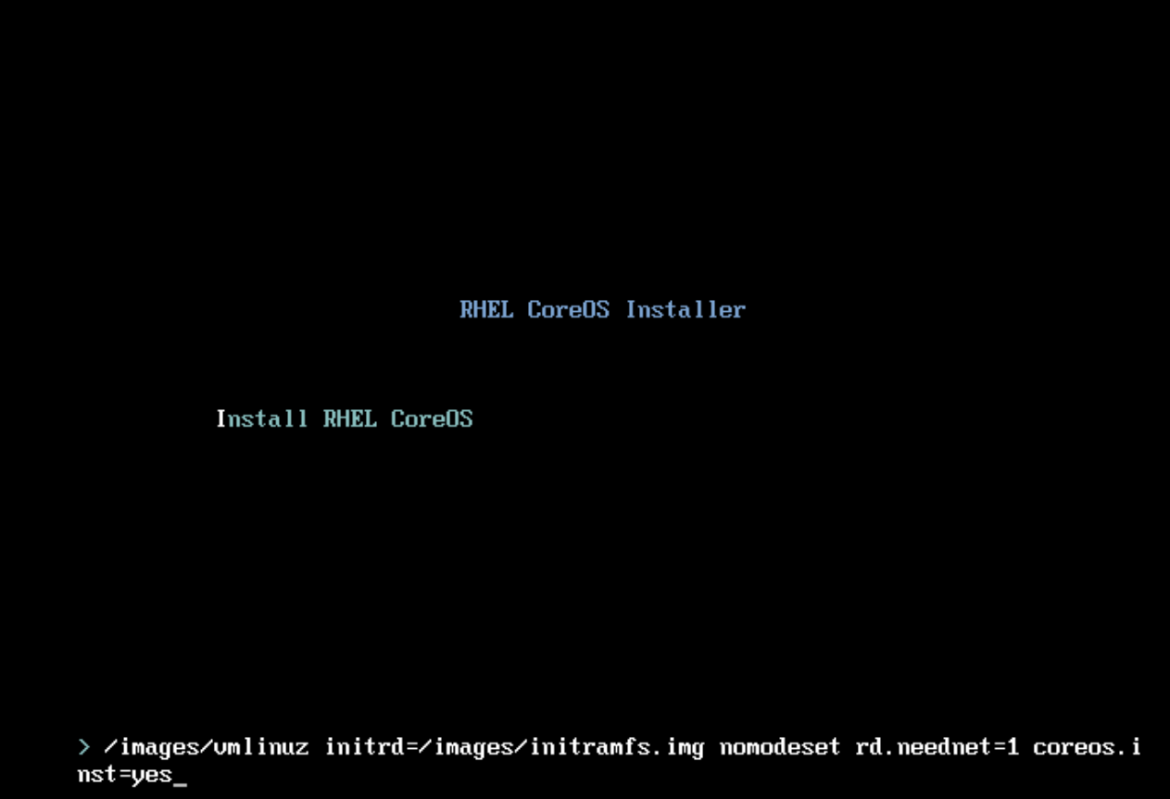
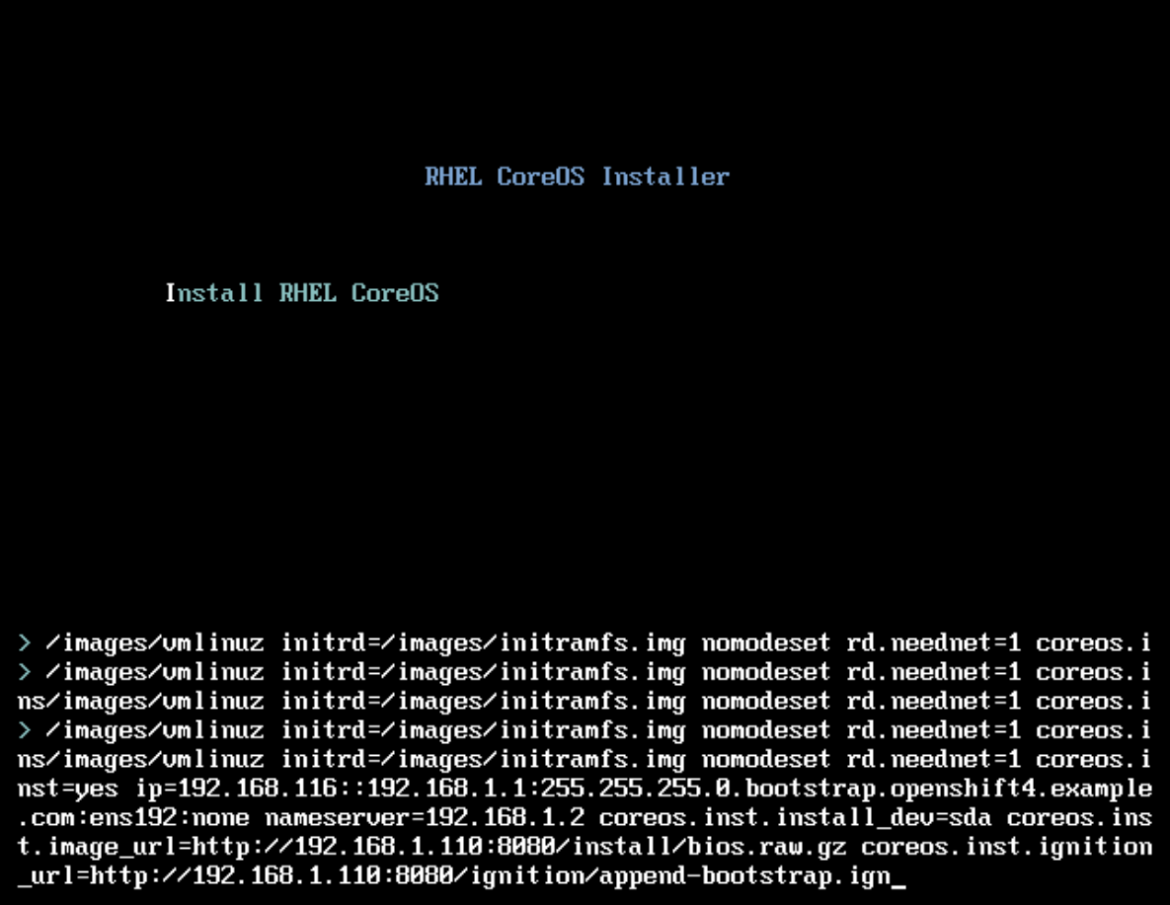
Next, boot up your bootstrap VM and open up the console. You'll get the "RHEL CoreOS Installer" install splash screen. Hit the TAB button to interrupt the boot countdown so you can pass kernel parameters for the install.
On this screen, you'll pass the following parameters. Please note that this needs to be done all on one line, I broke it up for easier readability.
ip=192.168.1.116::192.168.1.1:255.255.255.0:bootstrap.openshift4.example.com:ens192:none

nameserver=192.168.1.2

coreos.inst.install_dev=sda

coreos.inst.image_url=http://192.168.1.110:8080/install/bios.raw.gz

coreos.inst.ignition_url=http://192.168.1.110:8080/ignition/append-bootstrap.ign
NOTE Using
ip=...syntax will set the host with a static IP you provided persistently across reboots. The syntax is:ip=$IPADDRESS::$DEFAULTGW:$NETMASK:$HOSTNAMEFQDN:$IFACE:none nameserver=$DNSSERVERIP
This is how it looked like in my environment:
Do this for ALL your servers, substituting the correct ip/config where appropriate. I did mine in the following order:
- Bootstrap
- Masters
- Workers
Bootstrap Process
Back on the installation host, wait for the bootstrap complete using the OpenShift installer.
[chernand@laptop openshift4]$ openshift-install wait-for bootstrap-complete --log-level debug

DEBUG OpenShift Installer v4.2.0

DEBUG Built from commit 90ccb37ac1f85ae811c50a29f9bb7e779c5045fb

INFO Waiting up to 30m0s for the Kubernetes API at https://api.openshift4.example.com:6443...

INFO API v1.14.6+2e5ed54 up

INFO Waiting up to 30m0s for bootstrapping to complete...

DEBUG Bootstrap status: complete

INFO It is now safe to remove the bootstrap resources
Once you see this message you can safely delete the bootstrap VM and continue with the installation.
Finishing Install
With the bootstrap process completed, the cluster is actually up and running; but it is not yet in a state where it's ready to receive workloads. Finish the install process by first exporting the KUBECONFIG environment variable.
[chernand@laptop openshift4]$ export KUBECONFIG=~/openshift4/auth/kubeconfig
You can now access the API. You first need to check if there are any CSRs that are pending for any of the nodes. You can do this by running oc get csr, this will list all the CSRs for your cluster.
[chernand@laptop openshift4]$ oc get csr

NAME AGE REQUESTOR CONDITION

csr-4hn7m 6m36s system:node:master3.openshift4.example.com Approved,Issued

csr-4p6jz 7m8s system:serviceaccount:openshift-machine-config-operator:node-bootstrapper Approved,Issued

csr-6gvgh 6m21s system:node:worker2.openshift4.example.com Approved,Issued

csr-8q4q4 6m20s system:node:master1.openshift4.example.com Approved,Issued

csr-b5b8g 6m36s system:node:master2.openshift4.example.com Approved,Issued

csr-dc2vr 6m41s system:serviceaccount:openshift-machine-config-operator:node-bootstrapper Approved,Issued

csr-fwprs 6m22s system:node:worker1.openshift4.example.com Approved,Issued

csr-k6vfk 6m40s system:serviceaccount:openshift-machine-config-operator:node-bootstrapper Approved,Issued

csr-l97ww 6m42s system:serviceaccount:openshift-machine-config-operator:node-bootstrapper Approved,Issued

csr-nm9hr 7m8s system:serviceaccount:openshift-machine-config-operator:node-bootstrapper Approved,Issued
You can approve any pending CSRs by running the following command (please read more about certificates in the official documentation):
[chernand@laptop openshift4]$ oc get csr --no-headers | awk '{print $1}' | xargs oc adm certificate approve
After you've verified that all CSRs are approved, you should be able to see your nodes.
[chernand@laptop openshift4]$ oc get nodes

NAME STATUS ROLES AGE VERSION

master1.openshift4.example.com Ready master 9m55s v1.14.6+c07e432da

master2.openshift4.example.com Ready master 10m v1.14.6+c07e432da

master3.openshift4.example.com Ready master 10m v1.14.6+c07e432da

worker1.openshift4.example.com Ready worker 9m56s v1.14.6+c07e432da

worker2.openshift4.example.com Ready worker 9m55s v1.14.6+c07e432da
In order to complete the installation, you need to add storage to the image registry. For testing clusters, you can set this to emptyDir (for more permanent storage, please see the official doc for more information).
[chernand@laptop openshift4]$ oc patch configs.imageregistry.operator.openshift.io cluster \

--type merge --patch '{"spec":{"storage":{"emptyDir":{}}}}'
At this point, you can now finish the installation process.
[chernand@laptop openshift4]$ openshift-install wait-for install-complete

INFO Waiting up to 30m0s for the cluster at https://api.openshift4.example.com:6443 to initialize...

INFO Waiting up to 10m0s for the openshift-console route to be created...

INFO Install complete!

INFO To access the cluster as the system:admin user when using 'oc', run 'export KUBECONFIG=/home/chernand/openshift4/auth/kubeconfig'

INFO Access the OpenShift web-console here: https://console-openshift-console.apps.openshift4.example.com

INFO Login to the console with user: kubeadmin, password: STeaa-LjEB3-fjNzm-2jUFA
Once you've seen this message, the install is complete and the cluster is ready to use. If you provided your vSphere credentials, you'll have a storageclass set so you can create storage.
[chernand@laptop openshift4]$ oc get sc

NAME PROVISIONER AGE

thin (default) kubernetes.io/vsphere-volume 13m
You can use this storageclass to dynamically create VDMKs for your applications.
If you didn't provide your vSphere credentials, you can consult the VMware Documentation site for how to set up storage integration with Kubernetes.
Conclusion
In this blog we went over how to install OpenShift 4 on VMware using the UPI method and how to set up RHCOS with static IPs. We also displayed the vSphere integration that allows OpenShift to create VDMKs for the applications.
Using OpenShift 4 on VMware is a great way to run your containerized workloads on your virtualization platform. Using OpenShift to manage your application workloads on top of VMware gives you the flexibility in your infrastructure to move workloads if the need arises.
We invite you to install OpenShift 4 on VMware vSphere and share your experience!
About the author
Christian Hernandez currently leads the Developer Experience team at Codefresh. He has experience in enterprise architecture, DevOps, tech support, advocacy, software engineering, and management. He's passionate about open source and cloud-native architecture. He is an OpenGitOps Maintainer and an Argo Project Marketing SIG member. His current focus has been on Kubernetes, DevOps, and GitOps practices.

