
Red Hat blog
Introduction
Credentials are environment dependent configurations that need to be kept secret and should be read only by subjects with a need-to-know.
A previous blog post talked about how to manage environment dependent configuration when building delivery pipelines - these approaches are not adequate for secrets because they don’t guarantee confidentiality.
OpenShift offers secrets as a way to inject credentials. Secrets behave as encoded-64 configmaps. From a security perspective, they have the following limitations (as of release 3.5):
- They are not encrypted at rest.
- By default, cluster admins can see all the secrets of all the tenants.
- When in use (i.e. mounted as tempfs in the node that runs the pod that is using them), they can be seen by a node administrator.
- When in use, they can be seen by anyone who has the ability to remote shell into the container.
If your organization can accept these limitations, I encourage you to use secrets because I believe that they will get better in future releases of OpenShift.
If your organization cannot work with the current OpenShift secret feature, then you need to find another way to inject credentials in your pods.
In this article, I present an integration with Vault from Hashicorp to solve this problem. This orchestration was built on the work previously done by Kelsey Hightower.
Vault
Vault is secret store software. It can be used to safely store and manage credentials. Other examples can be found here. I think that two things distinguish Vault from the rest of the crowd:
- It is designed to be run in the cloud.
- It has the concept of managed backends. A backend can be anything that requires credentials (such as MySQL). Vault will create and rotate credentials for any managed backend.
Managed credentials make Vault interesting for those scenarios where high automation is required, while at the same time strict security requirements on credential management need to be enforced.
Credential Management Orchestration
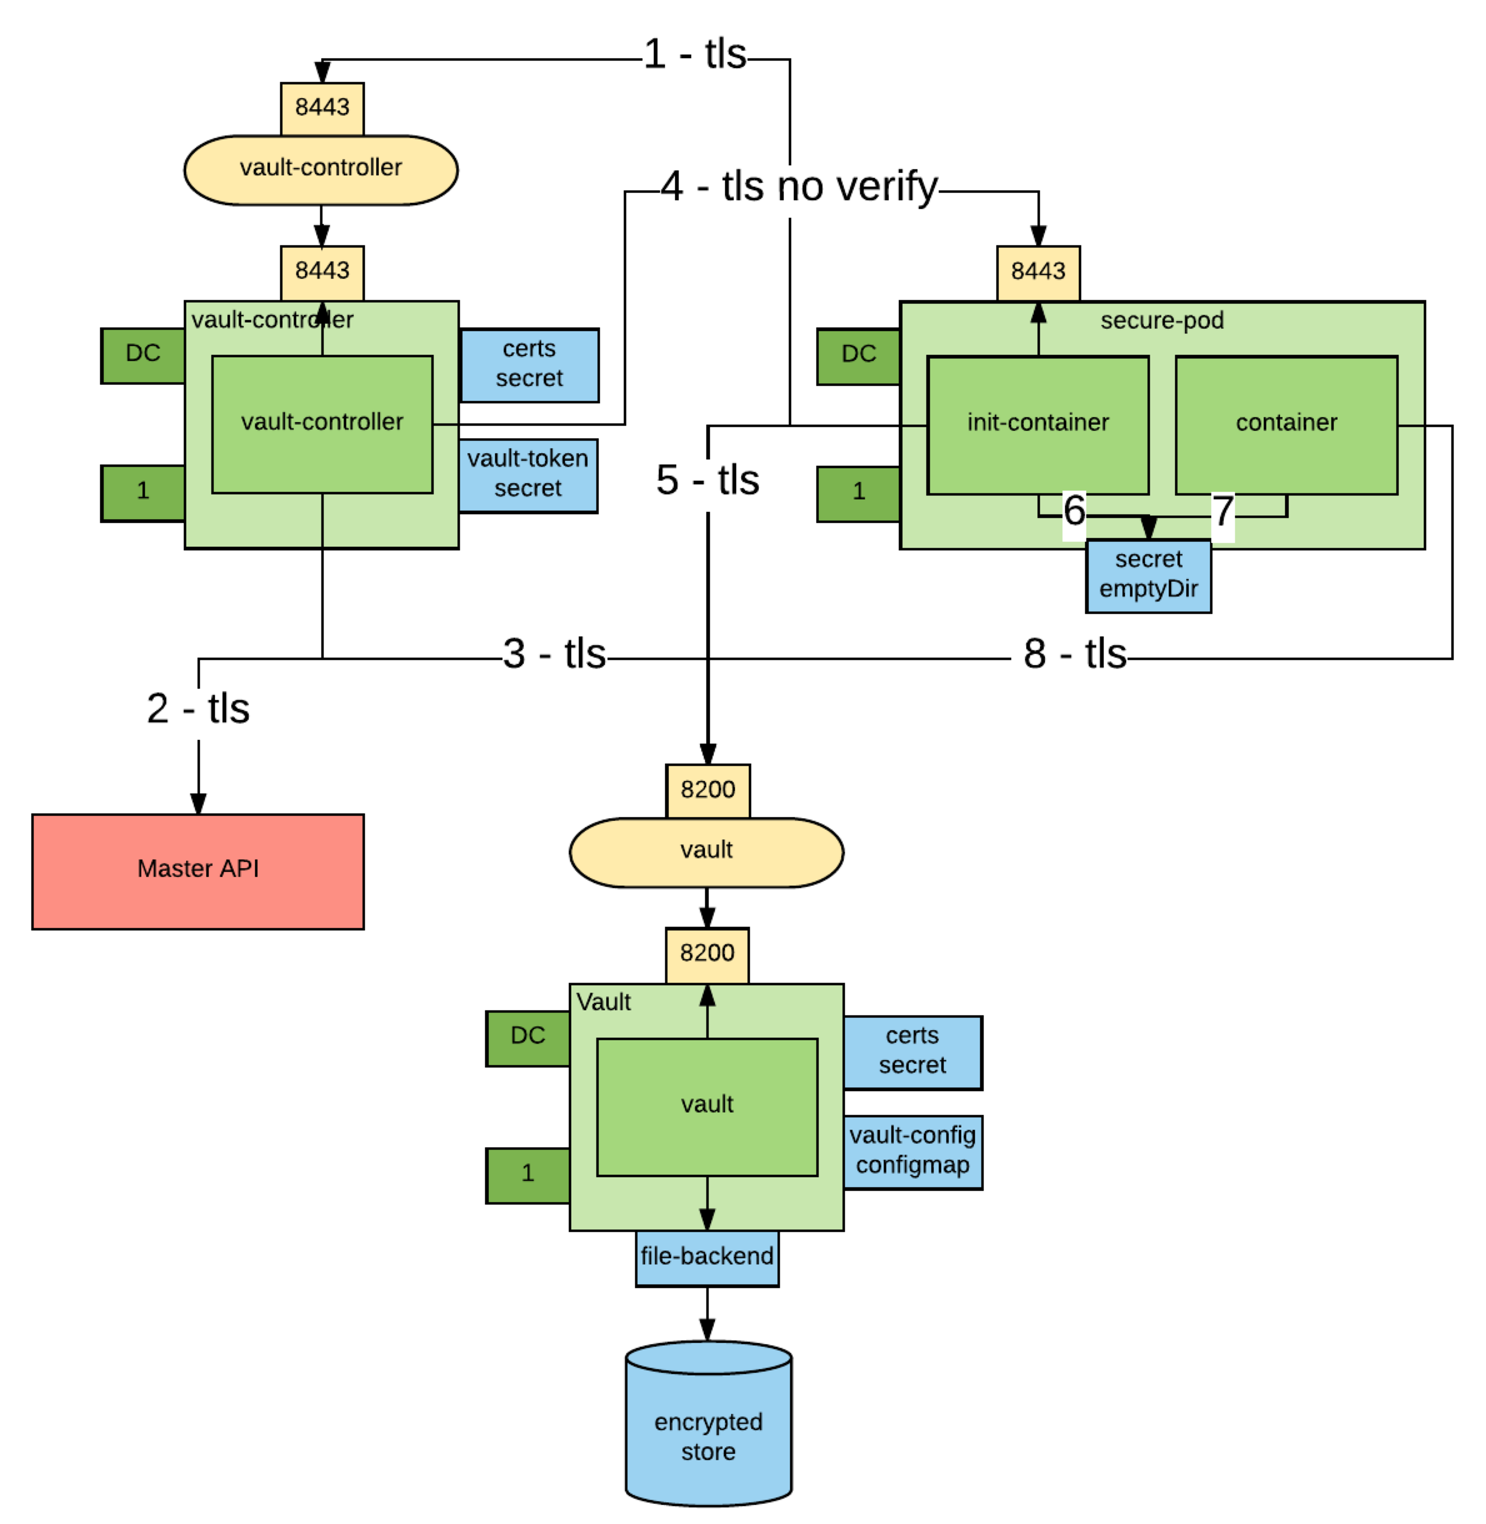
There are four actors in the orchestration that injects credentials into an OpenShift pod:
- The Vault instance.
- The Vault Controller. The Vault Controller is a trusted intermediary and has high privileges with Vault. In fact, the Vault Controller can create new Vault tokens.
- An Init Container. Init Containers are containers that are run before the main container of a pod is started. Their job is to set up the right environment for the main container. The design decision is to put the Vault orchestration logic in an Init Container so not to have to add behavior to the main container and therefore have greater reusability of existing images.
- The main container that needs the credentials.
The below picture represents the orchestration:

- An Init Container requests a wrapped token from the Vault Controller over an encrypted connection. Wrapped credentials allow you to pass credentials around without any of the intermediaries having to actually see the credentials.
- The Vault Controller retrieves the pod details from the Kubernetes API server.
- If the pod exists and contains the vaultproject.io/policies annotation, the Vault Controller calls Vault and generates a unique wrapped token with access to the Vault policies mentioned in the annotation. This step requires trust on pod author to have used to right policies. The generated token has a configurable TTL.
- The Vault Controller "calls back" the Init Container using the pod IP obtained from the Kubernetes API over an encrypted connection and delivers it the newly created wrapped token. Notice that the Vault Controller does not trust the pod, it only trusts the master API.
- The Init Container unwraps the token to obtain a the Vault token that will allow access to the credentials.
- The Vault token is written to a well-known location in a volume shared between the two containers (emptyDir) and the Init Container exits.
- The main container reads the token from the token file. Now the main container can use the token to retrieve all the secrets allowed by the policies considered when the token was created.
- If needed, the main container renews the token to keep it from expiring.
This integration mitigates some of the attack vectors that we have seen before, in fact:
- Credentials are encrypted at rest in Vault.
- No OpenShift cluster admin can see the credentials, plus in Vault you can create sharded master keys so that no Vault admin can, by themselves, unencrypt the credentials.
- The token used to connect to Vault has a short TTL. It the responsibility of the pod consuming the token to renew it before it expires. So, the token persisted on the file system can only be used for a short time - mitigating the risk that someone reads it (either node administrator or user rsh-ing in the container). The application consuming the token may also choose to delete the token after it reads it, further mitigating the risk.
A variation of this use case is also supported for legacy applications.
In this case, the Init Container not only unwraps the token, but it also uses the unwrapped token to retrieve a secret (which must be static because no further communication with Vault will occur). As before, the secret is written to a well-known location, so the main container can use it. In this case, the secret is still vulnerable to being viewed by node administrators or users with the ability to remote shell into the containers.
The following table summarizes the threat model:
| Attack Vector | Vault Aware App | Legacy App | OpenShift Secrets |
|---|---|---|---|
| reading secrets at rest | ok | ok | no |
| reading secrets in transit | ok | ok | ok |
| reading secrets via the API | ok | ok | no |
| reading secrets in use from within the container (rsh) | ok | no | no |
| reading secrets in use from the node | ok | no | no |
Installing the Vault Infrastructure
Clone this repository:
git clone https://github.com/raffaelespazzoli/credscontroller
cd credscontroller
Create a New Project:
oc new-project vault-controller
Install Vault:
oc adm policy add-scc-to-user anyuid -z default

oc create configmap vault-config --from-file=vault-config=./openshift/vault-config.json

oc create -f ./openshift/vault.yaml

oc create route passthrough vault --port=8200 --service=vault
Initialize Vault:
export VAULT_ADDR=https://`oc get route | grep -m1 vault | awk '{print $2}'`

vault init -tls-skip-verify -key-shares=1 -key-threshold=1
Unseal Vault:
- You have to repeat this step every time you start vault.
- Don't try to automate this step, this is manual by design.
- You can make the initial seal stronger by increasing the number of keys.
- We will assume that the
KEYSenvironment variable contains the key necessary to unseal the vault and thatROOT_TOKENcontains the root token.
For example:
export KEYS=9++8KEDd72S3aGc0zaY9JW11tnQRDTEkCZWMHK2D0CM=

export ROOT_TOKEN=c30909da-a713-94bf-bf6e-46180ef79a64

vault unseal -tls-skip-verify $KEYS
Install Vault Controller:
oc create secret generic vault-controller --from-literal vault-token=$ROOT_TOKEN

oc adm policy add-cluster-role-to-user view system:serviceaccount:vault-controller:default

oc create -f ./openshift/vault-controller.yaml
Running the Example
At this point, you are ready to start deploying pods that use the above approach to inject secrets.
The repository comes with two examples - one for a Vault-aware app and one for a legacy app. The instructions below are for the Vault-aware example.
In this first example, a Spring Boot app uses the Spring Cloud Vault Config plugin to get part of its configuration from Vault.
The Init Container will write the unwrapped Vault token to a well-known location and the app will use that token to authenticate with Vault and retrieve its credentials.
Create the Vault Policy:
We need to create a policy that will allow access to a specific subset of secrets. This is how you can have multiple applications storing their secrets in Vault.
export VAULT_TOKEN=$ROOT_TOKEN

vault policy-write -tls-skip-verify spring-example ./examples/spring-example/spring-example.hcl
Create the Secret:
We now store a static secret in Vault:
vault write -tls-skip-verify secret/spring-example password=pwd
Build the App:
oc new-project spring-example

oc new-build registry.access.redhat.com/redhat-openjdk-18/openjdk18-openshift~https://github.com/raffaelespazzoli/credscontroller --context-dir=examples/spring-example --name spring-example
Allow the App to Talk to Vault and Vault Controller:
You need to execute this step only if you are running in a multi-tenant OpenShift:
oc adm pod-network join-projects --to vault-controller spring-example
Deploy the App:
oc create -f ./examples/spring-example/spring-example.yaml

oc expose svc spring-example
Verify the App:
export SPRING_EXAMPLE_ADDR=http://`oc get route | grep -m1 spring | awk '{print $2}'`

curl $SPRING_EXAMPLE_ADDR/secret
The last command should return the secret that was initially stored in Vault.
About the author

Raffaele is a full-stack enterprise architect with 20+ years of experience. Raffaele started his career in Italy as a Java Architect then gradually moved to Integration Architect and then Enterprise Architect. Later he moved to the United States to eventually become an OpenShift Architect for Red Hat consulting services, acquiring, in the process, knowledge of the infrastructure side of IT.