We’ve updated this post from 2017 as it’s incredibly popular with our readers. The original post from 2017 begins after this newly updated post (6/10/2020) ends.
Many organizations use Microsoft Windows as the desktop operating system for their organizations. This means that many OpenShift administrators, and developers using OpenShift will have Windows as their first, and sometimes only, option to interact with and manage the OpenShift clusters they have been assigned.
This updated blog post will show one method of making the OpenShift admin and developer CLI tools easily accessible on your Windows 10 workstation so that you can interact with and manage OpenShift clusters and features without having to rely on a Linux bastion, Windows Subsystem for Linux, or other tools which are not Windows native.
The processes described below do not require you to be a workstation administrator. They have been tested with Windows 10 using PowerShell 5.1 and a standard, non-administrator user account.
Creating a place to store CLI tools
After downloading each of the CLI binaries, the simplest solution is to unpack the binary and use the full path, for example “C:/Users/Andrew/Downloads/openshift-client-windows/oc.exe”, whenever you need to interact with your OpenShift cluster. However, this is not the most convenient way. It is much easier to have the binary be a part of your Path environment variable so that it will be accessible using only the command name from anywhere.
To make things as easy as possible, we are going to create a directory on our local workstation in a location which is user writable. The example I’ve created uses the local AppData directory, so if you are using a roaming profile please be aware that the tools will not follow your login. To begin, open a new PowerShell prompt and use the commands below to create the directory.
#Create the directory for OpenShift CLI tools

New-Item -ItemType Directory $env:LOCALAPPDATA\RedHat\OpenShift
You don’t need to use the above directory path, you can put it anywhere in your local or roaming profile, or even your Downloads or Documents folder if you like, but regardless I would encourage you to create a dedicated folder which will be added to the Path so as not to inadvertently add other executables that you may not want.
Easy access using the path
With the directory created, we need to add it to our path. This makes it easy to execute the commands from wherever you are in the file system instead of having to use an absolute or relative path for each invocation.
# to add the location to your path for *this PowerShell session only*
# use this command
$env:Path += ";$env:LOCALAPPDATA\RedHat\OpenShift"
# to add the location to your path for *all future PowerShell sessions* use
# this command
Add-Content $env:USERPROFILE\Documents\WindowsPowerShell\profile.ps1 `
  '$env:Path += ";$env:LOCALAPPDATA\RedHat\OpenShift"'
# to add the location to your path for *all future CLI sessions*, regardless
# of shell, use these two commands
$CurrentPath = [Environment]::GetEnvironmentVariable('Path', [System.EnvironmentVariableTarget]::User)


[Environment]::SetEnvironmentVariable( `
  "Path", `
  $CurrentPath + ";$env:LOCALAPPDATA\RedHat\OpenShift", `
  [System.EnvironmentVariableTarget]::User `
)
If you have any open PowerShell sessions, you’ll need to either execute the first command or close and re-open for the updated path variable to be used. If you’re using Command Prompt (cmd), you will need to use the third command, then open a new instance.
OpenShift CLI commands
OpenShift has multiple CLI commands available, depending on which features and capabilities have been deployed to your cluster. You can download and have all of them available if needed, but at a minimum you’ll want to have oc and/or kubectl.
OpenShift CLI (oc)
OpenShift, like any Kubernetes based solution, can leverage the kubectl command to interact with and manage the cluster. Red Hat also creates and publishes the oc CLI, which extends the capabilities of kubectl with many convenience functions that make interacting with both Kubernetes and OpenShift clusters easier.
To use the oc command on your Windows desktop, first download the zip from https://cloud.redhat.com/openshift. Select the option to create a cluster using OpenShift Container Platform, then select any target infrastructure, and on the next page it will offer the download for the CLI tools at the bottom. Alternatively, use this link (which is the link found after following the instructions) to download the latest version of oc for Windows at any time.
To add oc to your path, use these commands from a PowerShell prompt to move it to the location we created above.
# unzip the file, this will work with PowerShell 5 or later, be sure to use
# the path to where you downloaded the zip. The force parameter is used to
# overwrite any conflicting files in the directory
Expand-Archive -Force -Path Downloads\openshift-client-windows.zip `
  -DestinationPath $env:LOCALAPPDATA\RedHat\OpenShift
# If you do not have PowerShell 5, use your favorite application to unpack
# the contents and move the oc binary to the folder, for example
Move-Item -Path oc.exe -Destination $env:LOCALAPPDATA\RedHat\OpenShift
You may also want to add the kubectl command to this same location for convenience.
OpenShift Developer CLI (odo)
Just as with the oc command, odo is downloaded and added to a location in the path to make it convenient to access from anywhere. Follow the same guidelines as above to download the binary, and move it into the path which was added to the environment.
Move-Item -Path odo.exe -Destination $env:LOCALAPPDATA\RedHat\OpenShift
Helm CLI (helm)
OpenShift 4.4 and later supports Helm 3 for deploying and managing Kubernetes applications to your clusters. Adding the helm CLI client is done in the same way as the others, first by downloading the most recent binary from the repository. Once downloaded, move it to the path created in the steps described for the oc CLI.
Move-Item -Path helm-windows-amd64.exe `
  $env:LOCALAPPDATA\RedHat\OpenShift\helm.exe
OpenShift Serverless CLI (kn)
If you’re using the OpenShift Serverless Operator to deploy serverless applications, then you’ll want access and control via the kn command. First, download the compressed archive from the repository, then unpack it to the directory used for the other CLI tools. For example, with version 0.13.2, here is the command to unpack the downloaded zip into the directory:
Expand-Archive -Force -Path Downloads\kn-windows-amd64-0.13.2.zip `
  -DestinationPath $env:LOCALAPPDATA\RedHat\OpenShift
OpenShift Pipelines CLI (tkn)
OpenShift Pipelines uses Tekton to provide cloud-native CI/CD functionality within the cluster. The tkn command is used to manage the functionality from the CLI, which can be downloaded from the appropriate repository. Once the zip archive is downloaded, unpack it and move it to the folder in your path as with the other tools.
Expand-Archive -Force -Path Downloads\tkn-windows-amd64-0.9.0.zip `
  -DestinationPath $env:LOCALAPPDATA\RedHat\OpenShift
CodeReady Containers (crc)
Last, but not least, is Red Hat CodeReady Containers, an option to host a local, all-in-one OpenShift 4 cluster on your workstation. CodeReady Containers replaces minishift, used to run OpenShift 3 clusters on your workstation, as a quick and easy method of creating test and development clusters. Be sure to give the documentation a review to verify you have enough resources and any other prerequisites.
Once you are ready, download the crc Windows zip archive, then we’ll extract it to the same location as the other tools. Since this package is significantly larger than the other CLI tools, it is not recommended that it be placed in a location which is used for your roaming profile data. Be sure to put it into the local AppData or into your home directory to avoid very long login times in an enterprise environment!
Expand-Archive -Force -Path Downloads\crc-windows-amd64.zip `
  -DestinationPath $env:LOCALAPPDATA\RedHat\OpenShift
Please note that some versions of crc have an additional sub-folder in the zip archive. If, after using the above command to extract the CLI to the directory it is not working, check the contents of the folder using the dir command and move the CLI to the correct location using this command:
Move-Item -Path $env:LOCALAPPDATA\RedHat\OpenShift\crc*\crc.exe `
  -Destination $env:LOCALAPPDATA\RedHat\OpenShift\crc.exe
Authenticating with clusters
Now that you have the CLI tools available, to authenticate with the cluster, you have at least two options available. For a specific cluster or one-time login, use the oc login cluster_name.domain.name:8443 --username=myusername command. If you have a cluster, or clusters, which you use regularly, add the kubeconfig to your $env:USERPROFILE\.kube directory, then check and set the context as needed with the oc config get-contexts and oc config set-context commands.
Some organizations don’t include the .kube folder as one that is synced to the user’s roaming profile or part of the home directory. If that is the case for you, place the kubeconfig file(s) in a folder in your Documents directory, such as Documents\.kube, and then create the KUBECONFIG environment variable pointing to the file.
$env:KUBECONFIG="$($env:USERPROFILE)\Documents\.kube\kubeconfig"
With this configuration, the files will be synchronized and follow your login across workstations. If you want to set the KUBECONFIG environment variable every time you open a PowerShell prompt, follow the same steps as above to add the line to your PowerShell profile.
Tools for every environment
Now that you have the tools available on your Windows workstation, you can interact with OpenShift clusters just like you would from the Linux or MacOS command line. The documentation for each of the CLI commands includes examples of how to utilize them for maximum effect, and you can see many examples at try.openshift.com and learn.openshift.com as well. Finally, if you want to see some live-action OpenShift, visit us during a live stream at OpenShift.tv, where you can view our streams and seen the calendar of upcoming topics!
Below is the original version of this post from 2017.
A great way to get started using OpenShift on Windows is by using the CLI (Command Line Interface) with the OpenShift Origin Client Tools (OC Tools). This can be downloaded as a zip for Windows, and provides some powerful commands and an alternative to the web console for working with OpenShift locally or remotely. You may not think that you need this, but give it a try, and you'll probably be glad that you did.
I wrote these instructions using Windows 8.1 Pro, but the process should be the same or similar on Windows 10 and earlier versions such as Windows Vista, Windows 7, and Windows XP.
Download OC Tools
First, head to this page and look for the current Windows client tools release under "Downloads": https://github.com/openshift/origin/releases
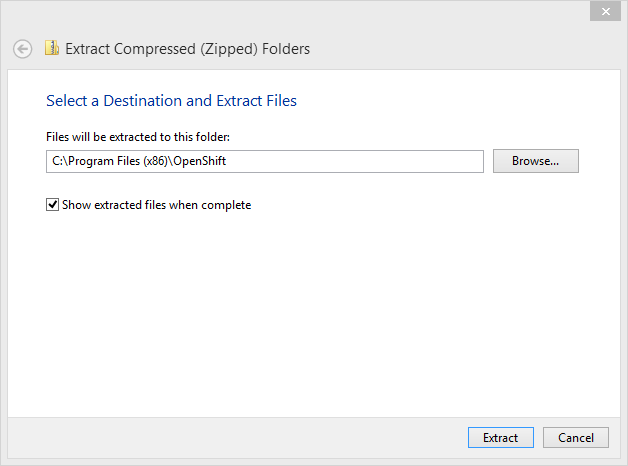
After downloading the zip, go ahead and open it, and Extract all. We're going to create C:\Program Files (x86)\OpenShift and place it there.
Once this is done, check out the README.md where you can learn about the origin of OpenShift and how it works. This is a great place to get started with putting your projects on OpenShift.
Setting the PATH
Next, it's time to set the system PATH environment variable for the directory containing oc.exe, which now resides in your newly created OpenShift folder. This makes it easy to access OC Tools by simply opening up command prompt and typing in an oc command. (Tip: In some versions of Windows, you can quickly open the command prompt by pressing Windows + X.)
Way 1: Using the System Control Panel (Recommended)
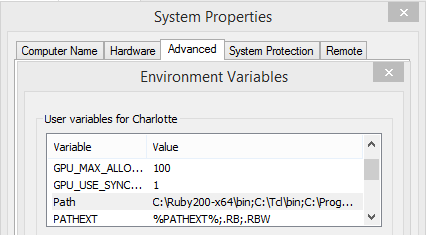
Open the Control Panel (hit the Windows key and then type Control Panel on 8.1 and above), and click on System. Click on Advanced system settings on the left or open the Advanced tab of System Properties. Click the button labeled Environment Variables... at the bottom. Look for the option in the User variables section for Path.
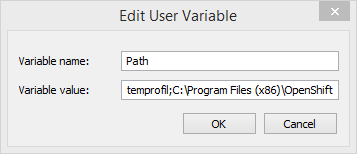
This will bring up a window that has a Variable value: form. Inside of this are each of the directories in the PATH, separated by a semicolon (;). Go to the end of this and add ;C:\Program Files (x86)\OpenShift. Click OK to save it.
Way 2: Using setx in the Command Prompt (Not Recommended)
Alternatively, you can add the directory to PATH through the command prompt. WARNING: Be careful doing it this way, as it will truncate the variables in your PATH to 1024 characters. If you have many paths in here, some will get lost (including the one that you just added), and there is no way around this, meaning that you cannot add anything this way.
You can see what is on your PATH by simply typing path in the command prompt. (This would be good to check if you're unsure if your PATH variables go beyond 1024 characters.) If your PATH is relatively short, then you can add to it in the terminal by typing setx PATH=%PATH%;C:\Program Files (x86)\OpenShift. This will permanently append it to your PATH environment variable (meaning that it will still be there after you exit the terminal).
Way 3: Editing the Registry
If neither of the above options are satisfactory to you, then try editing the registry directly. Warning: Use caution with this method, because things can go wrong easily when editing the registry.
Go to your start menu and type Run. Enter regedit in the form that pops up. This will open a branching directory to navigate. Go to HKEY_LOCAL_MACHINE -> System -> CurrentControlSet -> Control -> Session Manager -> Environment, then find Path and right-click on it and select Modify.... Append ;C:\Program Files (x86)\OpenShift and restart for this to take effect.
Way 4: PowerShell
Caution: This method also seems to have a character limit, so it may not work if you already have a lot of variables in PATH.
After you start up PowerShell, enter the following:
$PATH = [Environment]::GetEnvironmentVariable("PATH")`

$oc_path = "C:\Program Files (x86)\OpenShift"`

[Environment]::SetEnvironmentVariable("PATH", "$PATH;$oc_path")`
A restart may be required after this to see the new variable in PATH take effect.
Way 5: The Lazy Way (Not Recommended)
Alternatively, you can copy & paste oc.exe into C:\Windows or any other directory already on your PATH. This isn't recommended because it separates the .exe from the directory with the README, LICENSE, and version number, but is a quick way to get the job done if you don't want to set the PATH. (Don't do this; adding to your PATH isn't that hard once you know how.)
Test Out OC Tools
Now, test it out by opening up command prompt and entering oc version. You should now see the version number that you just downloaded.
Once you have this installed, check out my series on deploying your ASP.NET apps on OpenShift. Also head to the documentation to check out what you can now do with OC Tools.
What tips for using OpenShift on Windows would you like to see next? Leave a comment to let us know!
{{cta('1ba92822-e866-48f0-8a92-ade9f0c3b6ca')}}
About the author
More like this
Browse by channel
Automation
The latest on IT automation that spans tech, teams, and environments
Artificial intelligence
Explore the platforms and partners building a faster path for AI
Open hybrid cloud
Explore how we build a more flexible future with hybrid cloud
Security
Explore how we reduce risks across environments and technologies
Edge computing
Updates on the solutions that simplify infrastructure at the edge
Infrastructure
Stay up to date on the world’s leading enterprise Linux platform
Applications
The latest on our solutions to the toughest application challenges
Original shows
Entertaining stories from the makers and leaders in enterprise tech
Products
- Red Hat Enterprise Linux
- Red Hat OpenShift
- Red Hat Ansible Automation Platform
- Cloud services
- See all products
Tools
- Training and certification
- My account
- Developer resources
- Customer support
- Red Hat value calculator
- Red Hat Ecosystem Catalog
- Find a partner
Try, buy, & sell
Communicate
About Red Hat
We’re the world’s leading provider of enterprise open source solutions—including Linux, cloud, container, and Kubernetes. We deliver hardened solutions that make it easier for enterprises to work across platforms and environments, from the core datacenter to the network edge.
Select a language
Red Hat legal and privacy links
- About Red Hat
- Jobs
- Events
- Locations
- Contact Red Hat
- Red Hat Blog
- Diversity, equity, and inclusion
- Cool Stuff Store
- Red Hat Summit


