Red Hat blog
In part one of this series of articles we saw a way to connect multiple Red Hat OpenShift SDNs (Software Defined Network) from separate clusters by means of creating an encrypted network tunnel.
This tunnel can route IP packets between all the connected SDNs. Simply being able to route packets is not very useful unless, as with Istio, you have a way to discover pods and a way to load balance over a group of pods representing a service. Istio can do that because it uses the master API to discover the endpoints and then uses client-side load balancing.
In this article we are going to add platform-provided load balancing (also know as service proxying) and service discovery to our SDN tunnel solution. Let’s talk about them separately.
Service Proxying
With service proxying we need to be able to satisfy the requirement that if a pod in cluster A opens a Layer 4 connection (TCP or UDP) to a Kubernetes service IP and port, the connection is load balanced to one of the pods that backs that service.
Because our SDN tunnel can only route the IPs belonging to the pod CIDRs (in an OpenShift cluster the pod cidr and the service cidr are disjointed), we need to perform the proxying before the packets enter the tunnel.
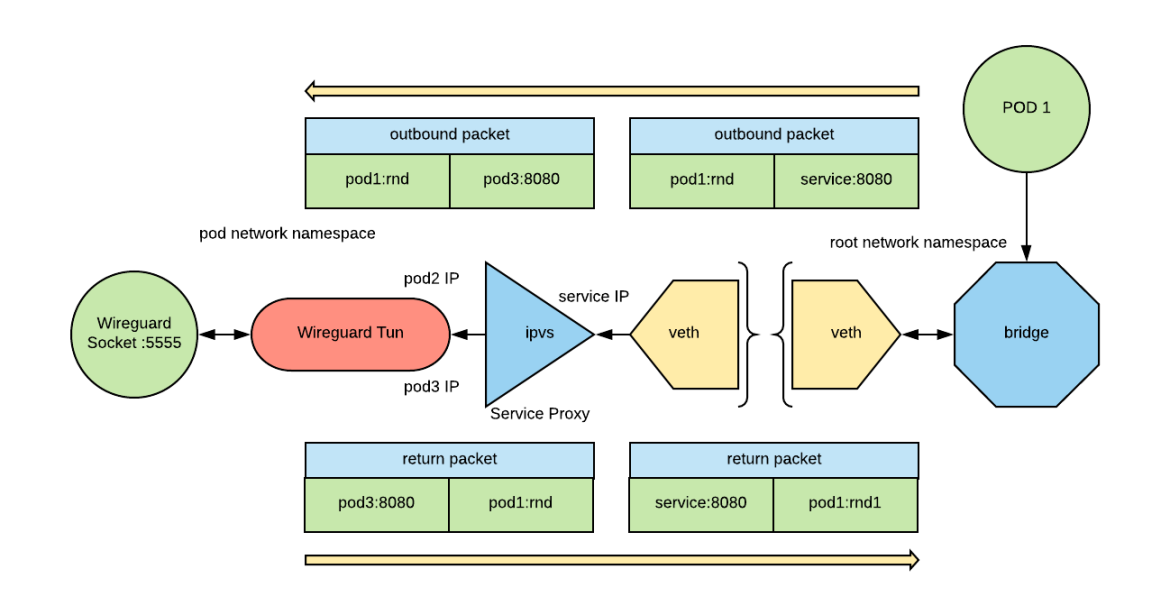
If you remember the tunnel design, we can use the daemonset pod for this operation. We can reroute all the packets belonging to the remote cluster service CIDR to the damenset pod (we can use the same technique we used for the packets belonging to the pod’s CIDR) and then perform the proxying operation. The below picture attempts to depict this design:
In order for this design to work, the service CIDRs of the clusters that we connect must not overlap. This is in addition to the requirement from the SDN tunnel design that the pod CIDRs should not overlap.
We need to choose a Layer 4 proxying mechanism. Historically in Kubernetes, the following approaches have been utilized:
- User space - An application running in user space perform the proxying operation.
- Iptables - Proxying is performed in kernel space (more efficient than user space) with a series of iptables rules (essentially based on NATting the destination).
- IPVS - A kernel module designed to create kernel space L4 load balancers.
We are not going to use the user space approach because kernel-based approaches are more efficient. We are also not going to use the iptables approach because, at least in the current design, it would not allow having more than two clusters connected because of potential naming clashes between the iptables rules.
IPVS seems the right approach; it’s efficient and its design specifically targets creating load balancers.
IPVS requires IP aliases to be created and attached to an interface. These IP aliases represent the VIPs. Then IPVS needs to be configured to listen on ports on those IPs. In the case of our pod, the interface to which we need to attach these IPs is eth0. The interface will look similar to the following:
3: eth0@if52: <BROADCAST,MULTICAST,UP,LOWER_UP> mtu 1400 qdisc noqueue state UP group default

    link/ether 0a:58:0a:80:02:2d brd ff:ff:ff:ff:ff:ff link-netnsid 0

    inet 172.31.68.37/32 brd 172.31.68.37 scope link eth0

       valid_lft forever preferred_lft forever

    inet 172.31.41.18/32 brd 172.31.41.18 scope link eth0

       valid_lft forever preferred_lft forever

…
Note: This can be retrieved using the command ip a.
Here we see two aliases, but many more can be attached depending on the number of services that are present in the connected clusters.
And the IPVS configuration will look similar to the following which can be viewed by executing ipvsadm -l -n ):
...

TCP  172.31.231.189:9080 rr

  -> 10.133.0.98:9080             Masq 1 0 0

  -> 10.133.0.99:9080             Masq 1 0 0

  -> 10.133.0.100:9080            Masq 1 0 0

UDP  172.31.206.197:53 rr

  -> 10.132.0.56:53               Masq 1 0 0

  -> 10.134.0.67:53               Masq 1 0 0

...
Once again, this proceeding is just a fragment of a possible output. In this example, we see a TCP service available at 172.31.231.189:9080 backed by three pods and a UDP service available at 172.31.206.197:53 backed by two pods.
As you can see, the IPVS endpoints are configured to load balance to pod IPs.
IPVS will change the destination address of the IP packet to one of the backend servers (called real servers in IPVS lingo). The routing rules configured in the pod and the Wireguard tunnel will then deliver the packet. When the answer comes back, IPVS will change the source address of the IP packet back to the service IP and then the packet will be forwarded to the original pod.
IPVS’ configuration should be created based on the state of the services of the connected clusters and updated constantly to reflect changes in the service configurations. This can be an ordeal, but conveniently Kube-router can do it for us.
Kube-router is a project that provides the following features:
- Implements a cni plugin capable of creating a BGP-based pod network
- Implements service proxying with IPVS.
- Implements Network Policies with iptables rules.
Each of these capabilities may be enabled independently, however we are only interested in service proxying.
Unfortunately Kube-router is designed to only run in-cluster (i.e. on a node of a Kubernetes cluster). We need it to run within a pod and that pod does not belong to the cluster it has to load balance to. Furthermore, we need to potentially run multiple instances of Kube-router within the same pod in case we connect three or more clusters. A customized version of kube-router for this solution can be found here which supports the above requirements.
Service Discovery
For service discovery, we need to be able to look up service IPs using DNS. Normally, after the lookup, the consumer will open a connection that will then be load balanced as described previously.
Services within Kubernetes already have an entry in the cluster’s DNS using the following pattern: <svc-name>.<namespace>.svc.cluster.local
The cluster.local domain is interpreted to represent “this” cluster, i.e. the cluster in which the requestor is running. If we assume that clusters have a name ( <cluster-name> henceforth), then by following the same convention, the domain of a cluster can be: cluster.<cluster-name>.
Using this convention, the requirement for service discovery becomes that we should be able to resolve names in the domain cluster.<cluster-name> for each of the clusters that we have connected. In addition, we also want to be able to continue resolving the cluster.local domain as well, as we want all the other requests to be redirected to an upstream DNS server.
This is a relatively complex set of requirements since the entries of each cluster domain are dynamic. In addition, to correctly resolve the cluster-local domain, we need to take into account the caller perspective.
CoreDNS is a very flexible name server solution as it has a plugin-based architecture. It turns out that one of its plugins, kubernetai, (which in greek is the plural for Kubernetes), can be used for to meet the above requirements.
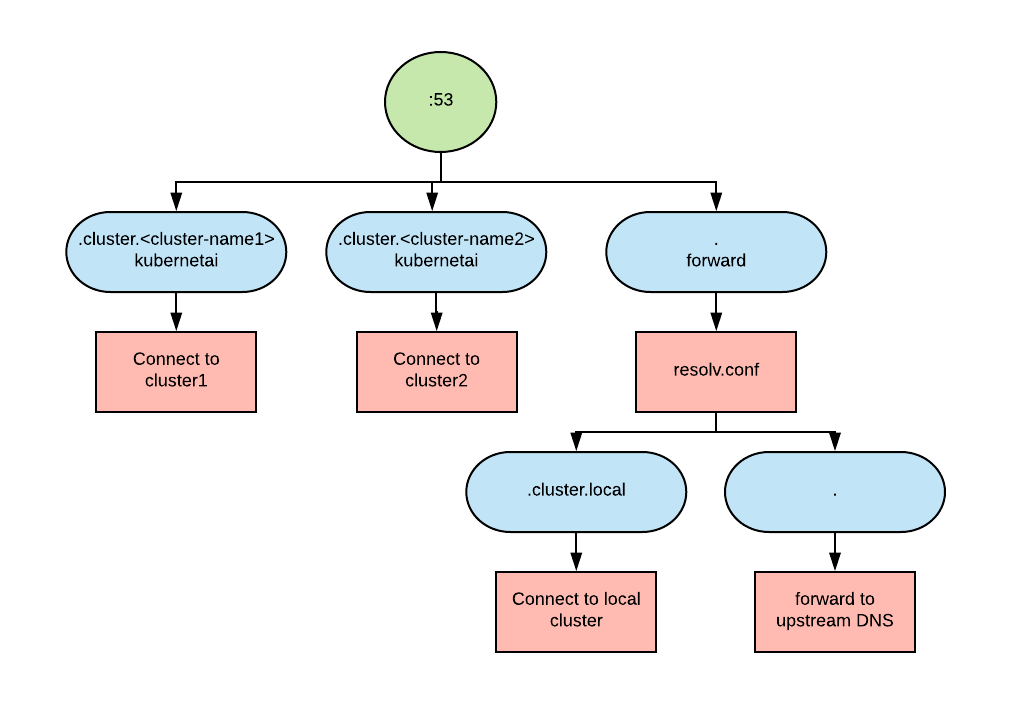
The architecture looks similar to the following:
The fragment below shows the salient pieces of coredns configuration:
cluster.<cluster-name1>:53 {

    kubernetai cluster.<cluster-name1> {

        kubeconfig ...

    }

...

}

cluster.<cluster-name2>:53 {

    kubernetai cluster.<cluster-name2> {

        kubeconfig ...

    }

...

}

.:53 {

    forward . /etc/resolv.conf

...

}
In this case we are connecting two clusters. In the coredns configuration, we have three sections: one for each cluster domain and one for everything else. The plugin resolving the request for the cluster domains is kubertenai, so we have two instances of the kubenetai plugin. For any other request, we forward the request to the values present in the resolv.conf file. Because we are running in a pod, resolv.conf will be able to resolve the cluster.local domain plus any other request that needs to be forwarded to the upstream DNS.
We can deploy CoreDNS as a pod in the same project where we have the SDN tunnel daemonset. In addition, we need to make sure that it is reachable from every project that needs to perform the discovery operation.
Having the DNS server correctly configured is not enough. We also need our pods to be configured to make use of it. Normally Kubernetes will start pods configured to use the cluster DNS. It is possible to change this default with the dnsPolicy attribute and allow for the injection of a custom resolv.conf using the dnsConfig attribute. The following is an example of how a modified pod would be represented:
...

  dnsConfig:

    nameservers:

      - <coredns service IP>

    searches:

      - svc.cluster.local

      - cluster.local

  dnsPolicy: None

...
This configuration can be added on a per pod basis or if cluster-level behavior is desired, it can be injected using a mutating admission controller.
It would be nice to have an additional domain called cluster.all that returns the merge of all the responses to a given query from all the connected clusters. I believe it’s not currently possible to create that configuration with the currently available coredns plugins.
Installation
The installation process has not changed since part 1 of this series: you can still use an Ansible playbook to deploy the tunnel, the service proxying, and discovery features.
Additional flags are now available and full details can be found here.
Once again, it is important to note that this solution is not officially supported by Red Hat and is currently a personal initiative to demonstrate strategies for supporting this type of solution.
Conclusions
This concludes our miniseries of posts on how to connect OpenShift SDNs.
With service proxying and discovery we have enhanced the solution proposed in the first part of the series, to the point that one should be able to leverage this solution with any type of application.
We can deploy this solution across any number of cluster and any type of infrastructure providers, this includes traditional on premise infrastructure, on premise cloud deployments and, of course, the major cloud providers (AWS, Google cloud, Azure). This solution should help building your hybrid cloud strategy.
About the author
Raffaele is a full-stack enterprise architect with 20+ years of experience. Raffaele started his career in Italy as a Java Architect then gradually moved to Integration Architect and then Enterprise Architect. Later he moved to the United States to eventually become an OpenShift Architect for Red Hat consulting services, acquiring, in the process, knowledge of the infrastructure side of IT.


