Red Hat blog
One of the fundamental principles of Continuous Delivery is Build Binaries Only Once. Subsequent deployments, testing and releases should be never attempt to build the binary artifacts again, instead reusing the already built binary. In many cases, the binary is built at each stage using the same source code, and is considered to be “the same”. But it is not necessarily the same because of different environmental configuration or other factors.
A Docker image is a “binary artifact” that includes all of the application stack and requirements. OpenShift creates a Docker image as part of each build. By treating the built Docker image as the deployable unit, OpenShift enables Build Once, Deploy Anywhere.
Assumptions
It is assumed that you have a general understanding of the basic usage of OpenShift 3 and access to an OpenShift 3 environment. If not, please take a look at the Amazon Web Services “Test Drive” for OpenShift, which can give you a free trial of OpenShift 3 running on top of AWS.
OpenShift Core Concepts in Build Once, Deploy Anywhere
Project
A project is a Kubernetes namespace with additional annotations, and is the central vehicle by which access to resources for regular users is managed. A project allows a community of users to organize and manage their content in isolation from other communities. Users must be given access to projects by administrators, or if allowed to create projects, automatically have access to their own projects.
Image Stream
An image stream is similar to a Docker image repository in that it contains one or more Docker images identified by tags. An image stream presents a single virtual view of related images.
1. Its own image repository in OpenShift's integrated Docker Registry
2. Other image streams
3. Docker image repositories from external registries
Service Account
A Service Account enables the components inside OpenShift to make API calls independently. Service Accounts provide a flexible way to control API access without sharing a regular user's credentials. A Service Account is a kind of non-human user. Built-in service accounts are as follows:
- system:image-builder, which is used by build pods, which allows pushing images to any image stream in the project using the internal Docker registry.
- system:deployer, which is used by deployment pods, which allows viewing and modifying replication controllers and pods in the project.
- default, which is used to run all other pod unless the specify different service account.
Template
A template describes a set of objects that can be parameterized and processed to produce a list of objects for creation by OpenShift. The objects to create can include anything that users have permission to create within a project, for example services, build configurations, and deployment configurations. A template may also define a set of labels to apply to every object defined in the template.
Steps
Build an Application
First, an application is built so that its “binary artifact” can later be deployed anywhere.
1.Create Project hello
oc new-project hello
2.Create Application php-hello-world
oc new-app https://github.com/akubicharm/php-hello-world.git
3.Expose the Application
oc expose service php-hello-world --hostname=php-hello-world.hello.apps.cloud

curl php-hello-world.hello.apps.cloud
You should see a response of “Hello World”. You would have to change your hostname depending on the configuration of your OpenShift environment.
Create Another Project
To simulate “deploy anywhere”, a new project should be created where the built image can be re-used. While possible previously with a few more steps, OpenShift v3.0.2.0 makes it even easier to deploy an application from an existing Docker image which was built in another project.
1.Create Project prod-hello
oc new-project prod-hello
2.Examine Project Policy of hello
oc describe policyBindings :default -n hello
-n hello, the -n flag tells the oc client which project to use
RoleBinding[system:image-pullers]:

Role: system:image-puller

Users:

Groups: system:serviceaccounts:hello

ServiceAccounts:

Subjects:
At this moment, no ServiceAccounts are specified for the system:image-pullers role on the hello project. The prod-hello project needs access to pull the images from the hello project.
3.Add ServiceAccount Access to hello Project
oc policy add-role-to-user system:image-puller system:serviceaccount:prod-hello:default -n hello
system:image-puller, is the role to add a user to.system:serviceaccount::, the “user account” to add to the role.
Running this command gives the system:image-puller role to the default Service Account from the prod-hello project to the hello project. In other words, you are granting read access to prod-hello in hello.
oc describe policyBindings :default -n hello
RoleBinding[system:image-pullers]:

Role: system:image-puller

Users:

Groups: system:serviceaccounts:hello

ServiceAccounts:prod-hello/default

Subjects:
Deploy with existing Image Stream
1.Create A Deployment Template
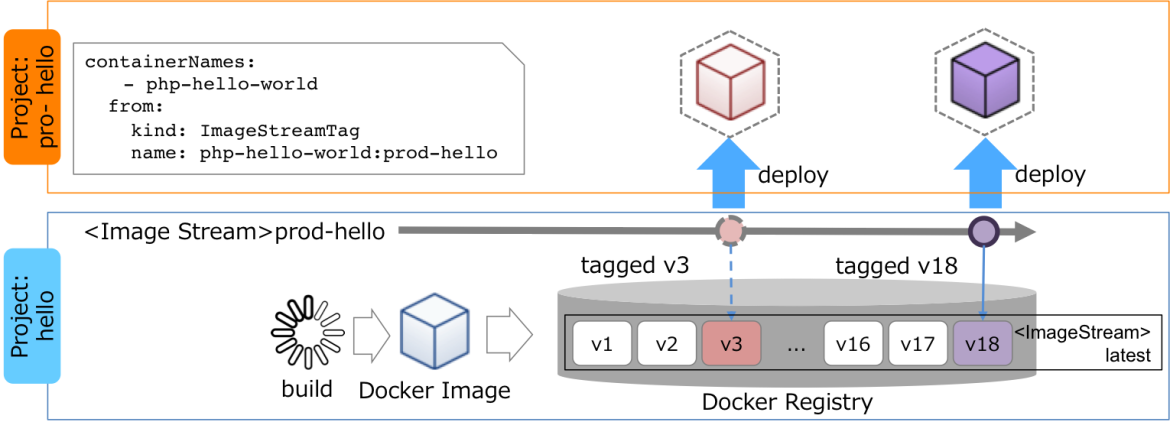
Since the purpose of “Build Once, Deploy Anywhere” is to only build once, it would be useful to create a quick way to deploy the existing built image from the original hello project. This can be done with a template. The existing resources in the hello project can be exported to form the base of this template. However, as prod-hello should not do another build, the buildConfig resource will be omitted from the final template.
oc export deploymentConfig,service,route -o yaml --as-template=php-hello-world > prod-php-hello-world.yaml
The name attribute of the ImageStreamTag and the host attribute of the Route should be changed. The updated snippets of the template should look like the following:
- apiVersion: v1

kind: DeploymentConfig

...

triggers:

- type: ConfigChange

- imageChangeParams:

automatic: true

containerNames:

- php-hello-world

from:

kind: ImageStreamTag

name: php-hello-world:prod-hello type: ImageChange
...
- apiVersion: v1 kind: Route ... spec: host: prod-hello-php.prod.cloudapps.example.com to: kind: Service name: php-hello-world
You can edit the template by hand or by using the scripts as follows. Be sure to use the appropriate hostnames/domains for your environment:
perl -i -pe 's/name: php-hello-world:latest/name: php-hello-world:prod-hello/g' prod-php-hello-world.yaml

perl -i -pe 's/php-hello-world.hello.apps.cloud/php-hello-world.prod.apps.cloud/g' prod-php-hello-world.yaml
Because the hello-prod project will not perform a build, there is no ImageStream which is tagged with hello-prod. This would prevent OpenShift from automatically deploying when the template is instantiated.
2.Instantiate the Template
oc project prod-hello

oc new-app -f prod-php-hello-world.yaml
3.Examine the ImageStream
oc project hello

oc get imageStream

oc describe imageStream php-hello-world

Name: php-hello-world

Created: 28 minutes ago

Labels: app=php-hello-world

Docker Pull Spec: 172.30.131.34:5000/hello/php-hello-world
Tag Spec Created PullSpec Image latest 26 minutes ago 172.30.131.34:5000/hello/php-hello-world@sha256:a94f7113d501dea557c952886d099b59825ad14e2a3f25aa545fe0311aef7b4c
4.Tag the ImageStream
oc tag hello/php-hello-world@sha256:a94f7113d501dea557c952886d099b59825ad14e2a3f25aa545fe0311aef7b4c prod-hello/php-hello-world:prod-hello
Please substitute the proper SHA string for your environment.
5.Deploy the Image
oc deploy prod-php-helo-world --latest -n prod-hello

Click the image to see it full size.
Summary
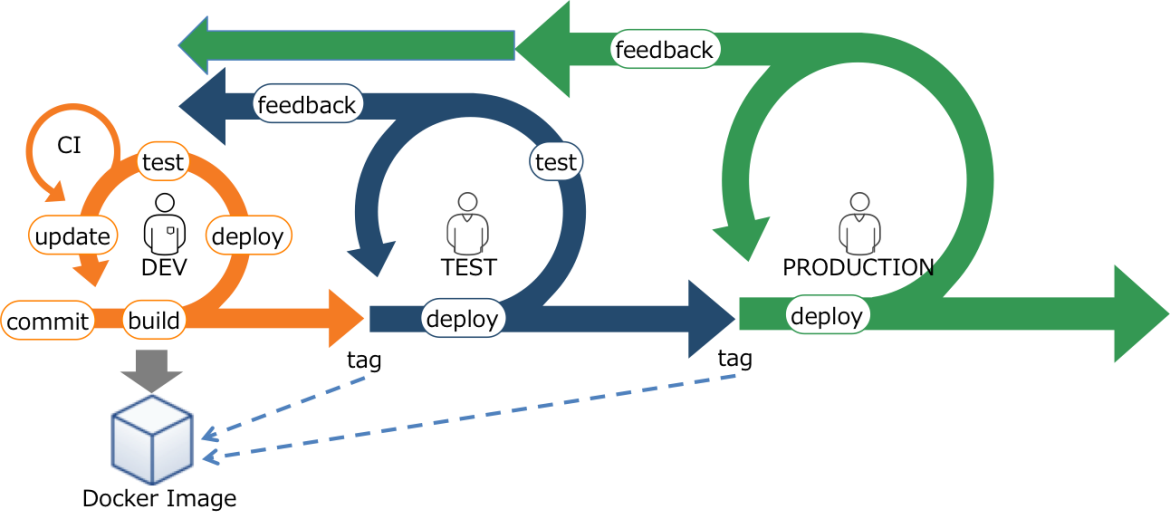
Docker’s container packaging format enables combining the application, system environment and data together. Through the use of various core components in OpenShift, you can easily and practically enable Continuous Delivery. OpenShift enables you to Build Once, Deploy Anywhere!

Click the image to see it full size.
Author
Kei Omizo
OpenShift Solution Architect,
Strategic Business Development APAC
Red Hat K.K.
@akubicharm
